Trad Climbing Kit for Multi Pitch

Following on from last weeks starting Trad Climbing Kit Article, here’s a run down of what kit you might need to move into the realms of Multi-Pitch Trad Climbing:

By now you’ve done plenty of single pitch climbing, and your chomping at the bit to get onto some longer routes, right? Hopefully you’ve acquired the skills to safely and correctly place gear, how to extend it properly to reduce rope-drag, and multiple ways of attaching yourself into a belay as well as probably having done some abseiling. The transition to trad multi-pitch climbing should be a fairly smooth one and progress should be fairly rapid, as you’re just adapting skills you already have…

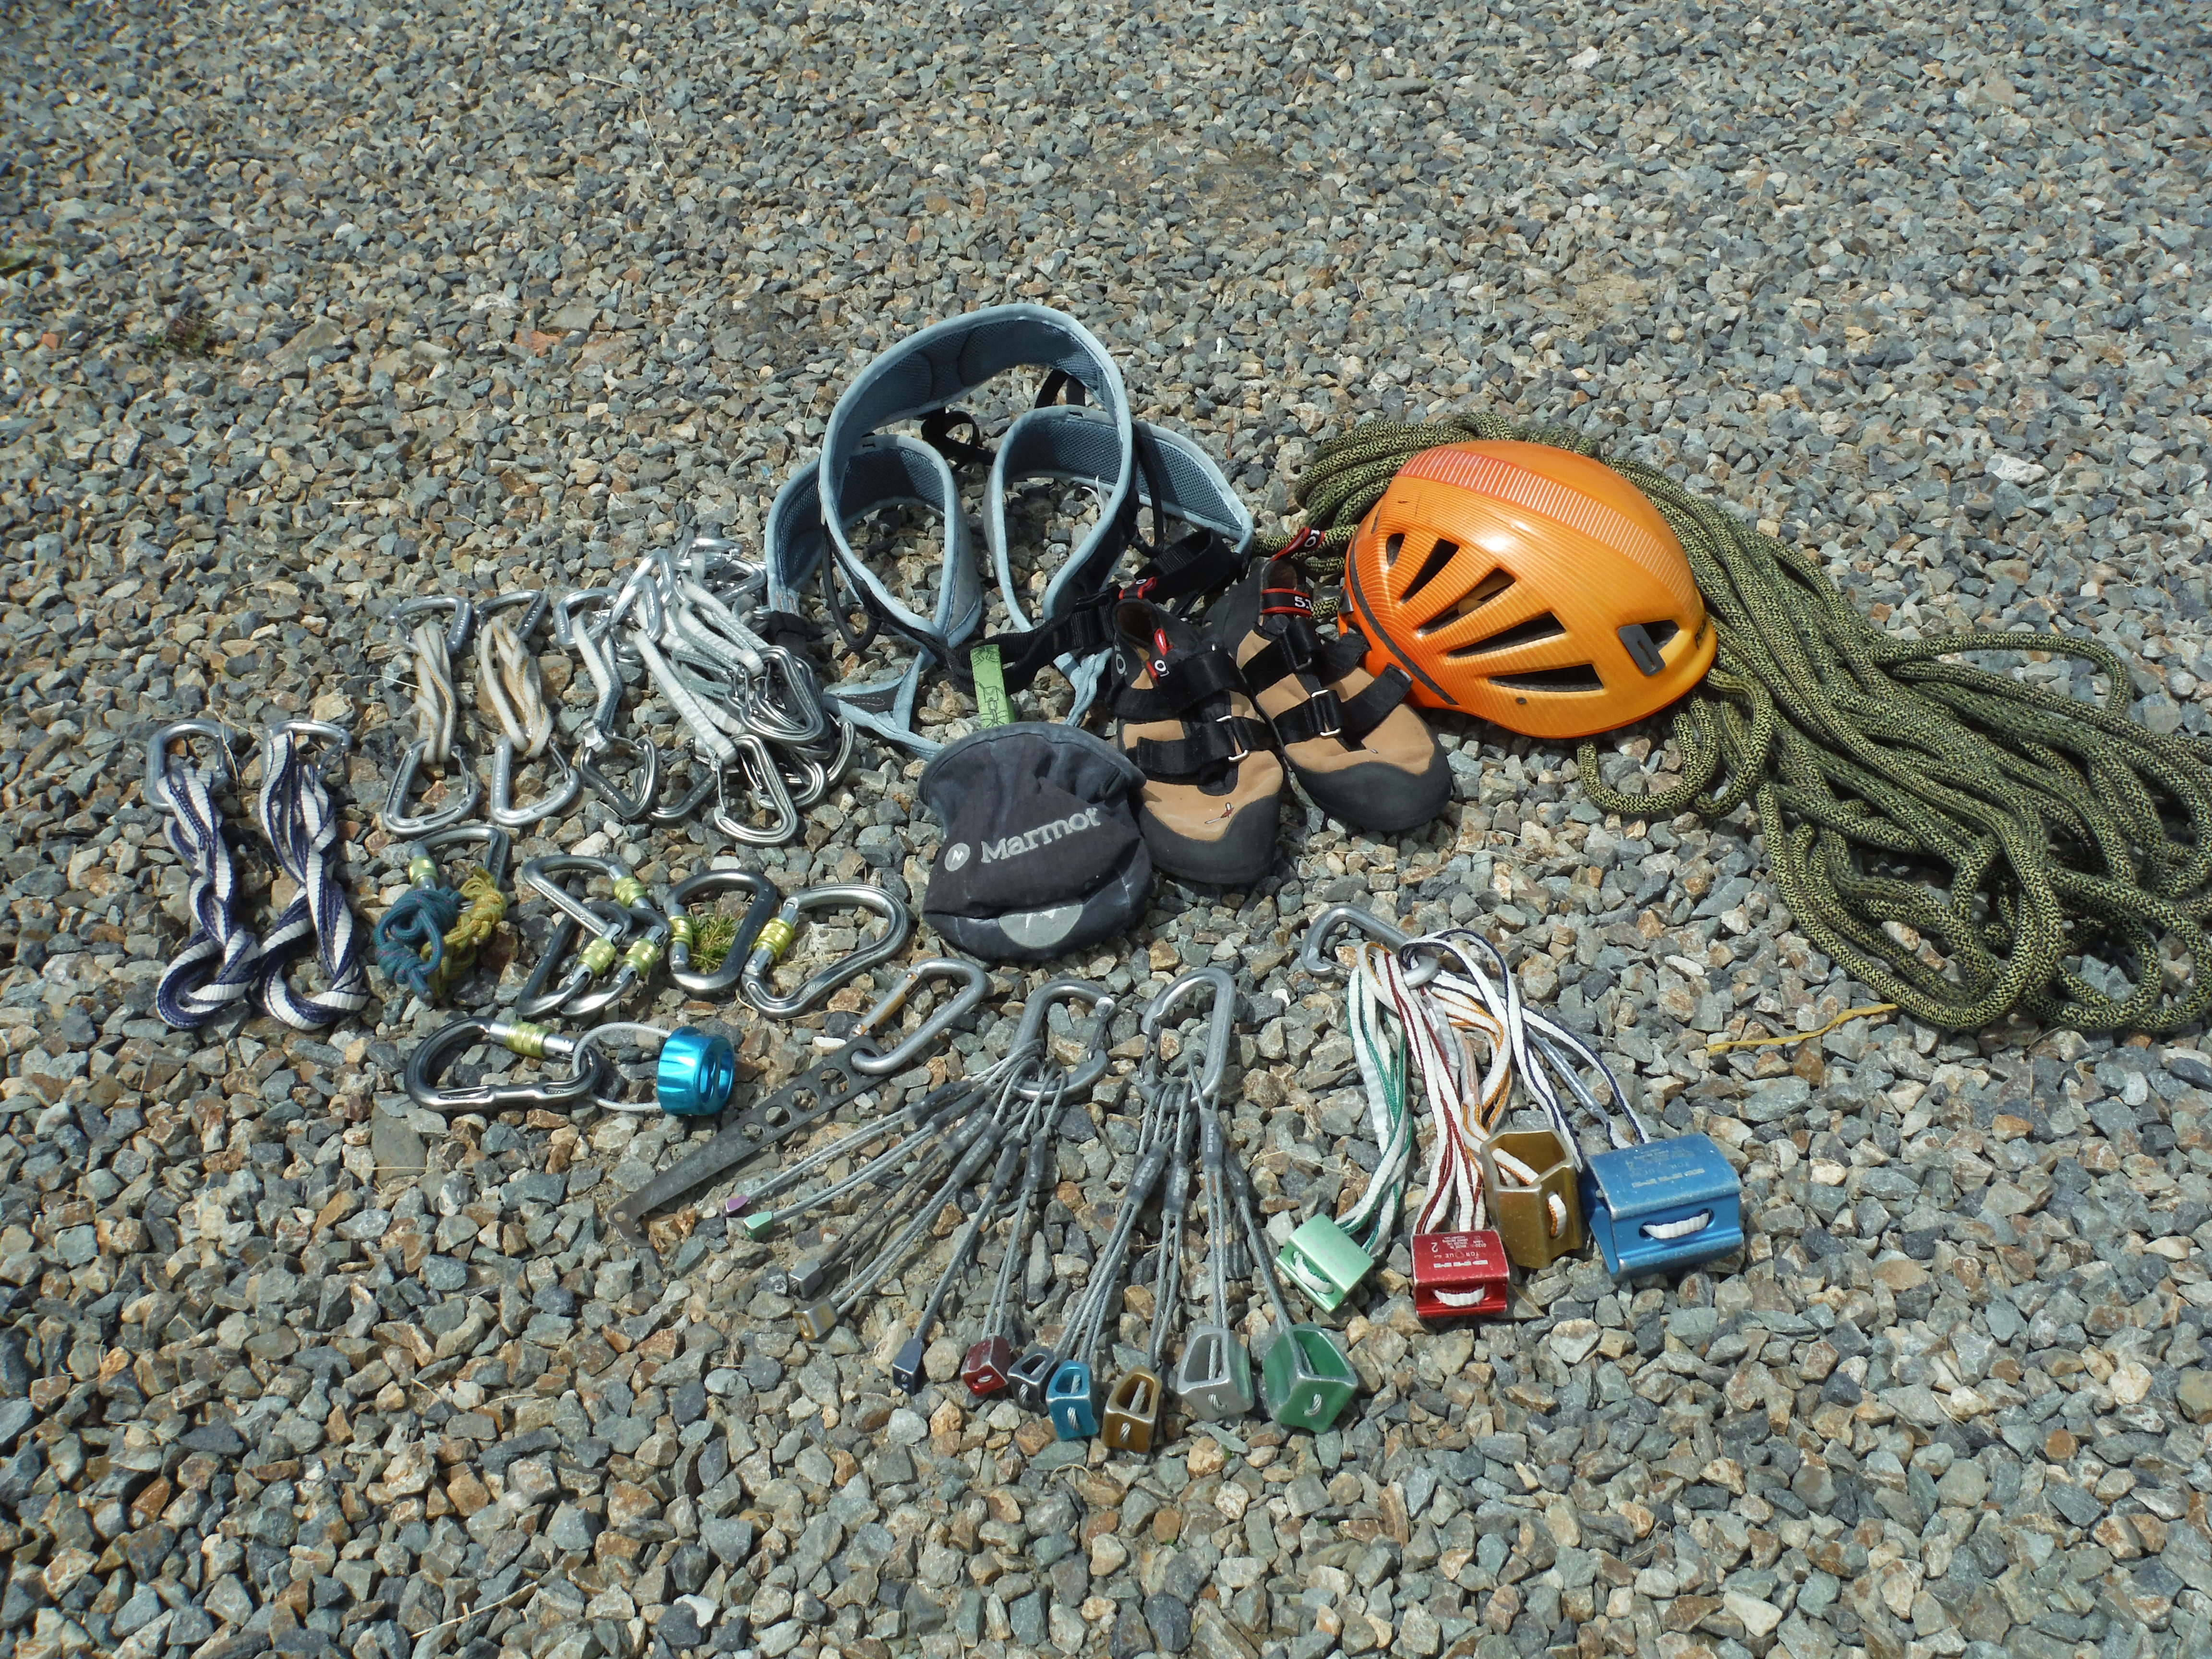
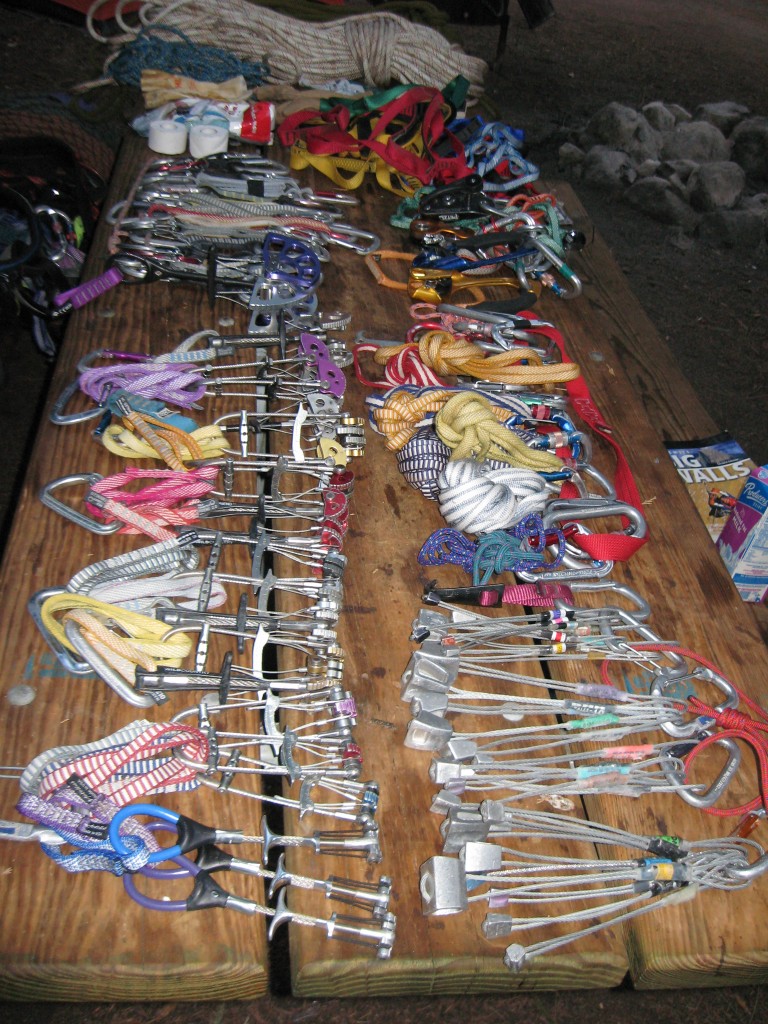
Now you’re getting on longer routes, it makes sense we might need more gear. All the previous information on kit holds true, so if you’re playing catch up check out the previous article: trad starter rack. All we really need is some duplicates of equipment we already have, plus perhaps a few new bits and pieces. This article is assuming we’re still looking at easy to mid-grade routes, and we shall look at specialist kit for harder routes another time…

fully laden with all the necessary trad climbing kit

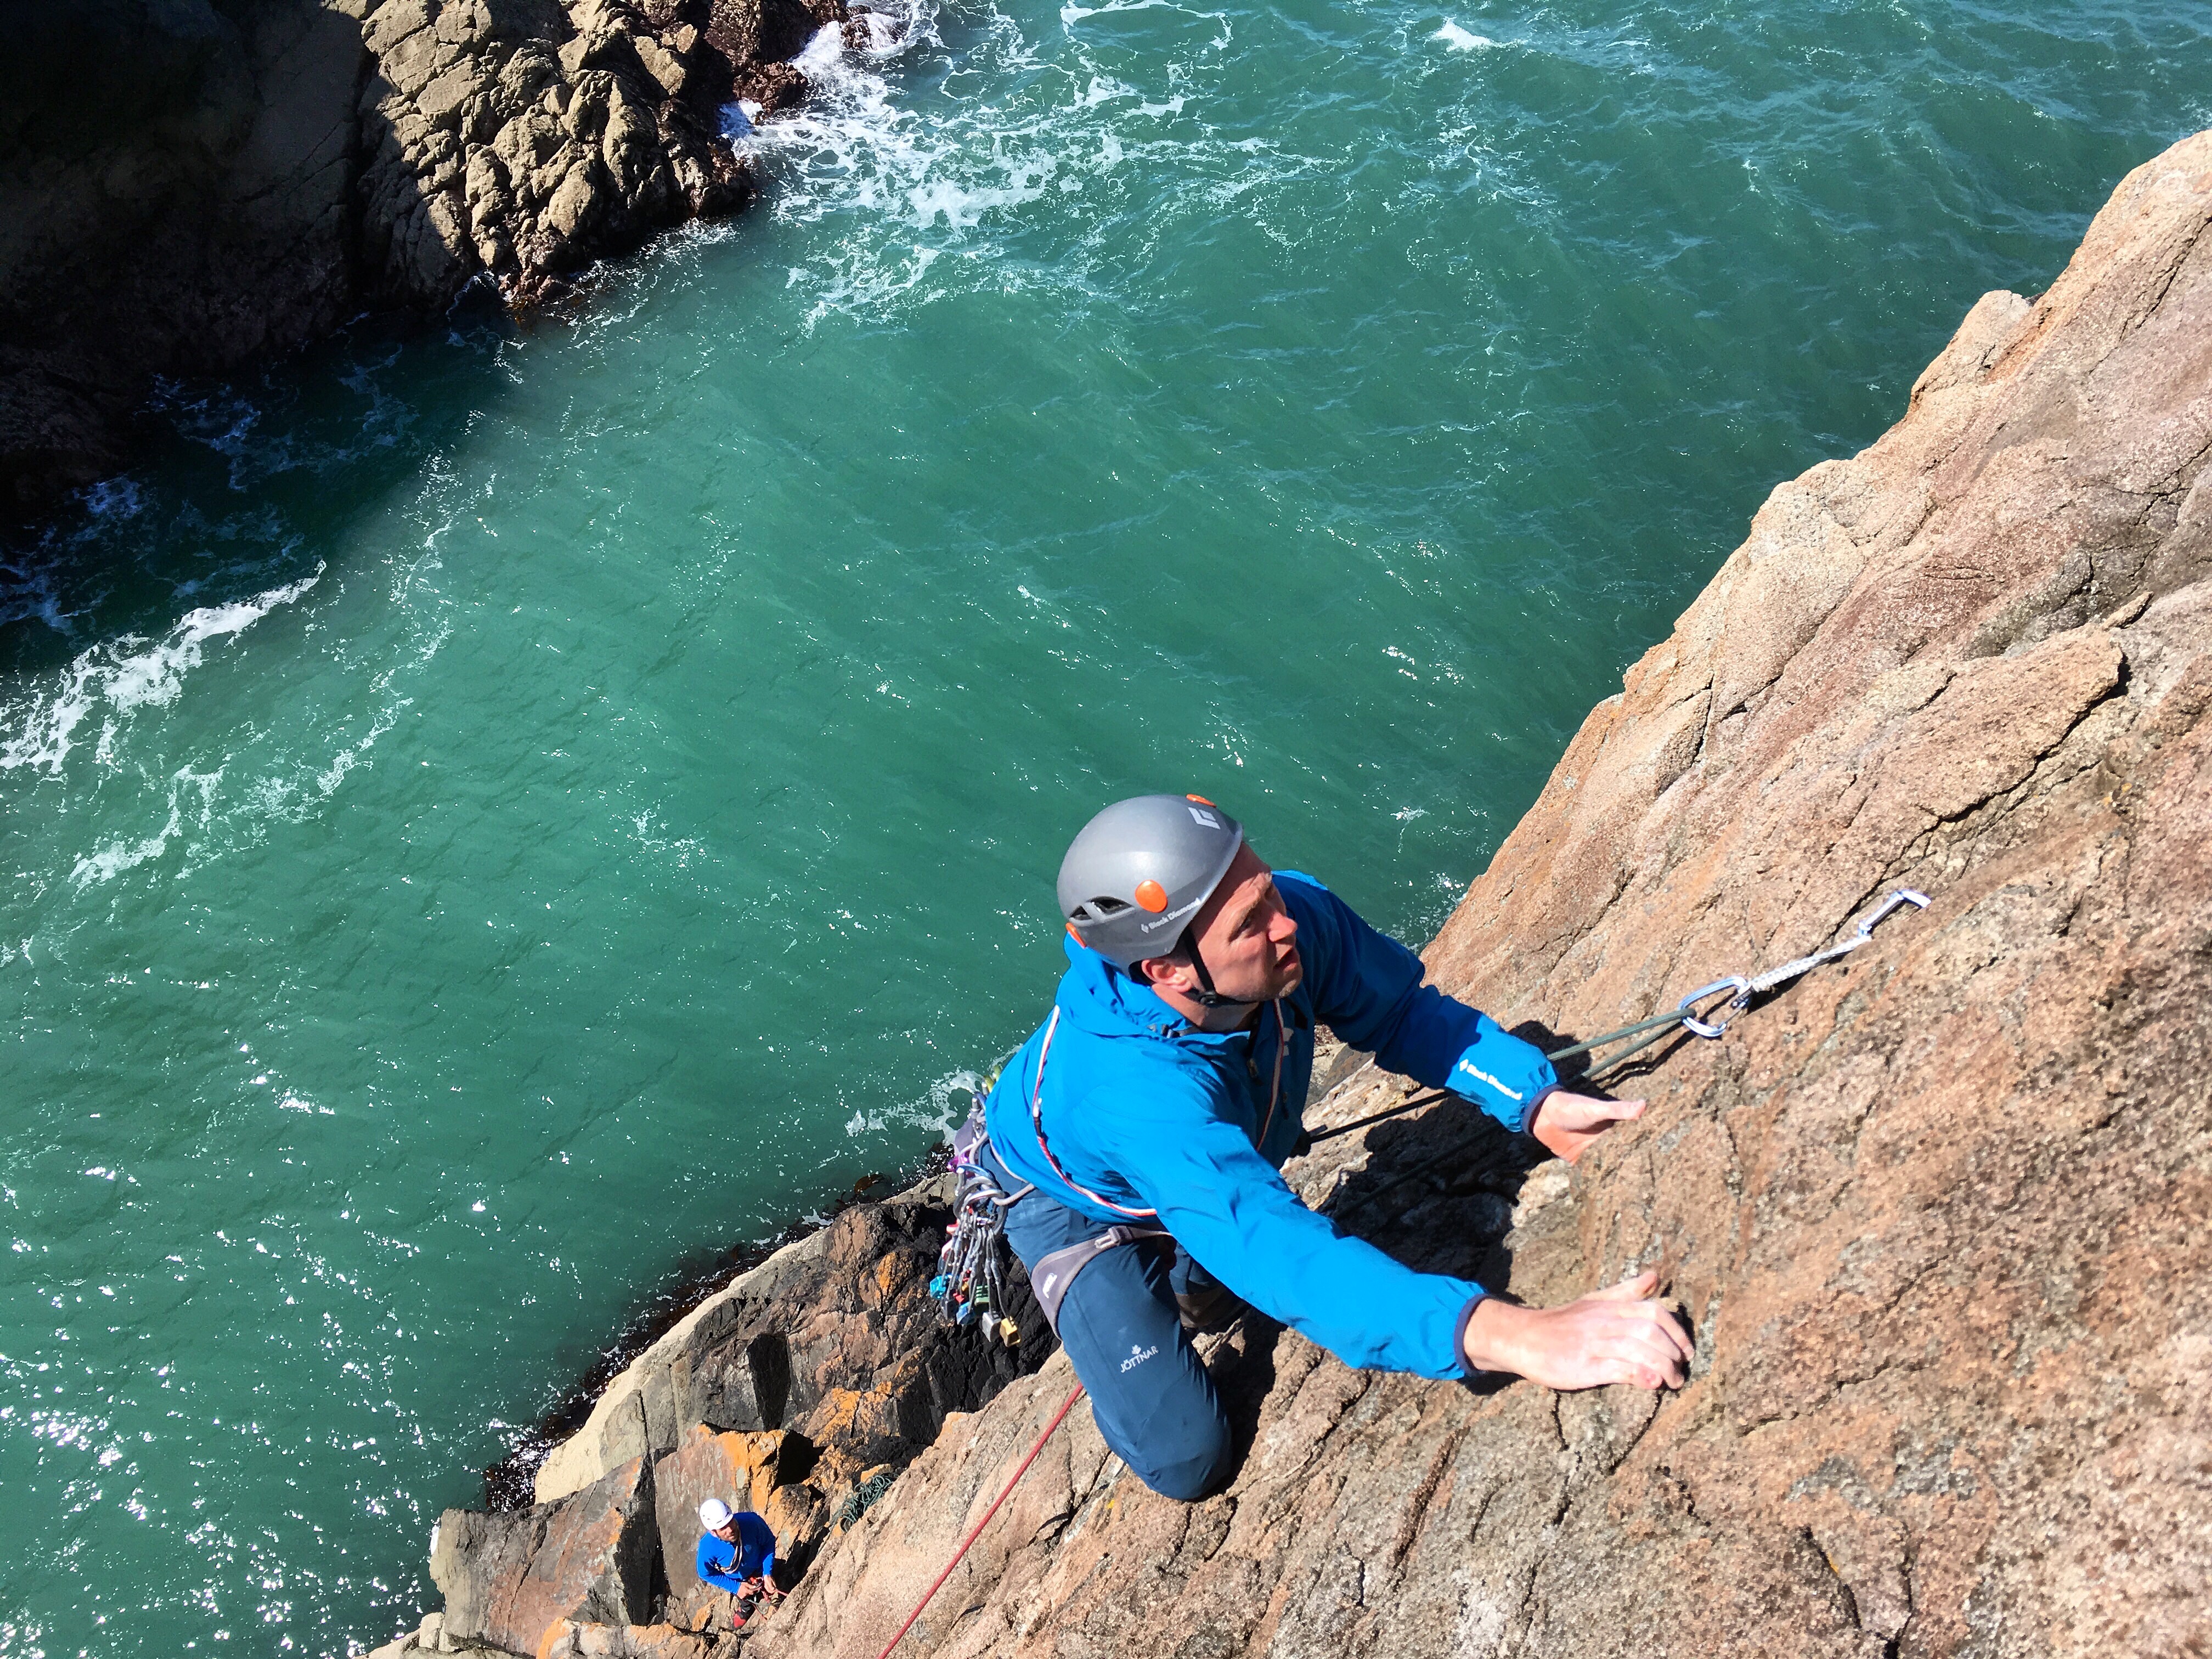
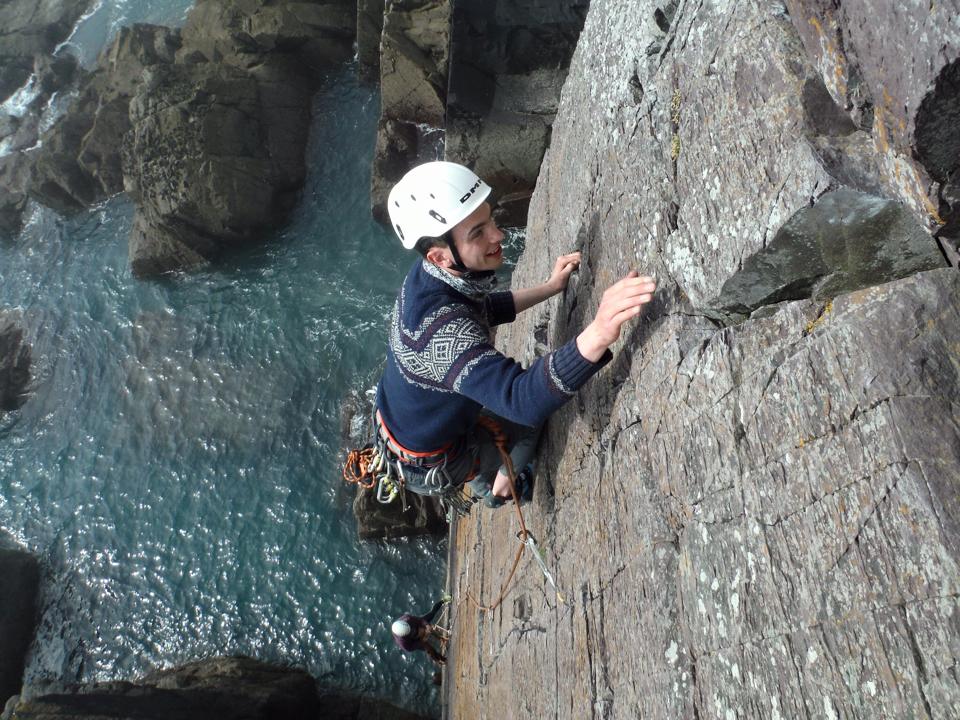
Multi-pitch Climbing Skills in Pembrokeshire

So, first up, get some more nuts! We started out with a single set of nuts, now we will want to double them all up. It might be an idea to go for the different brand to what you went with before. Slightly different shapes (even though the sizes are the same) give you more options. The DMM nuts tend to be a bit fatter and curvy, whilst Wildcountry are slimmer and straighter. I like to rack them in 4 size sets on separate carabiners. Roughly 1-3, 4-6, 7-9, 10-11. Too many nuts on a crab gets messy.

Last time we looked at hexes. Now I’m not saying scrap them, they are great on some traditional mountain routes, but now it’s time to think about getting some cams, which can make hexes a little redundant. It’s definitely best to leave these till now, as you really need to serve your apprenticeship placing really decent passive (nuts, hexes – no moving bits) protection first. Cams are what we call active protection (moving parts) and far, far too many people place them in a totally useless way as they simply don’t understand how it works. Placed well, in decent rock, cams are awesome bits of kit, and vital bits of kit in certain places (Stanage, any Gritstone or Granite crag etc…). You may be limited by cost as they are expensive, but in an ideal world we would get a set of at 1-4 including half sizes ( ie-7 cams!) but obviously that’s a retail value of mega$$! As a minimum I would try and get sizes 1,2,3 and you can build it up over time. Perhaps go in half’s with your climbing partner? Of the many brands out there, I would look at the excellent DMM Dragon, with useful extendable sling, or the Black Diamond Camalots. The golden rule with cams is extend extend extend! You’ll cry if they walk back into a crack to be lost forever or the rope drag inverts them and they get stuck!

We’re going to need to splash out on new ropes too. So far, we’ve been climbing on 1 single rope, which is great for sport climbing, indoors, and straight up trad climbs. There’s a good chance now on the multi-pitch climbs our routes will wander back and forth, with protection all over the place, and there’s a good chance you might start looking at retrievable abseils to descend from the crags. SO what we need, is a pair of half ropes. These are indicated with the rope mark, a circle with a half symbol inside (1/2). Using 2 ropes allow us to reduce rope drag (by clipping the rope nearest the straight line of kit we place), do a full length retrievable abseil, and also put lower impact on the kit (not that we’d be placing gear of dubious quality though eh?!) For UK trad, get 50 or 60m ropes – oh and make sure they are different colours! I’m a big fan of the offerings from Mammut.

About to step right into the next crack, you can see how using 2 half ropes can reduce rope drag...

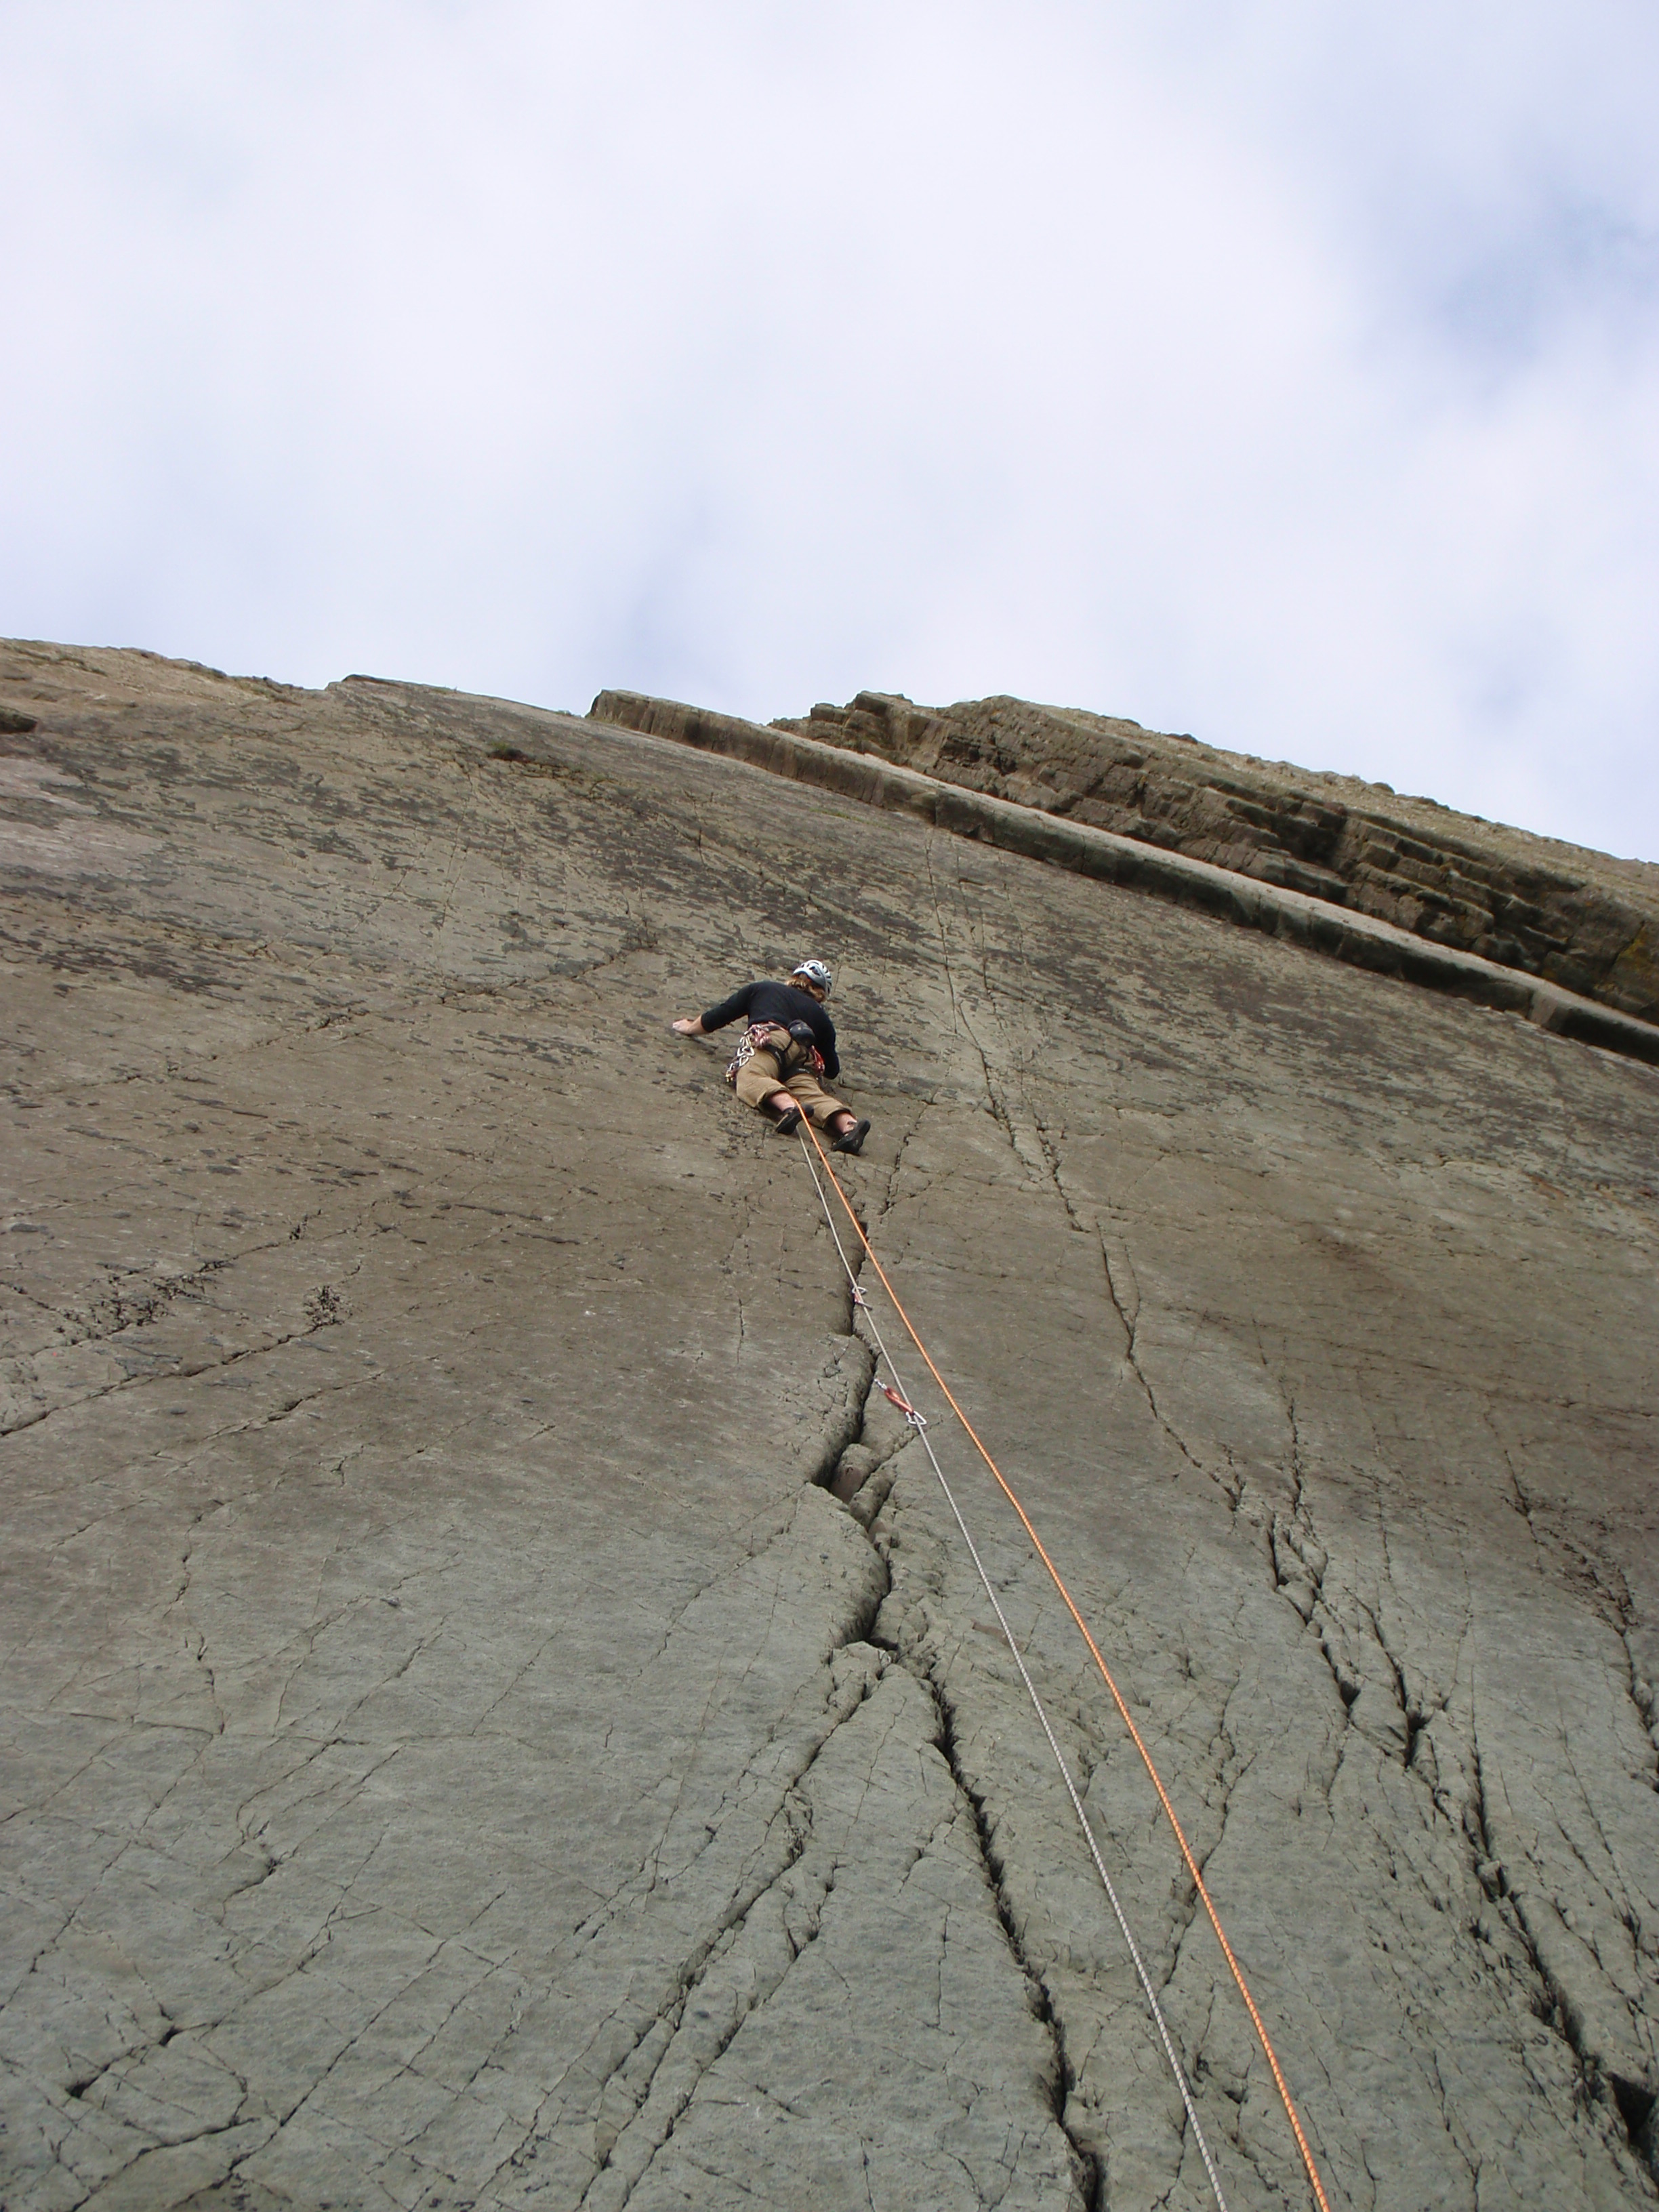
About to step right into the next crack, you can see how using 2 half ropes can reduce rope drag… Route: Amorican – VS 4c –  One of the best VS’s anywhere! Caerfai Bay, Pembrokeshire…

Something to think about now is what problems might occur when climbng that you need to sort out. Remember, once you’re more than a pitch up you can’t simply lower an injured climber to the floor, and once committed, escape might be difficult – you may need to abandon gear if retreating. The techniques need to be learned are many and varied, and that’s another article. Better still, book on one of our “Self Rescue for Climbers Courses“! However, have a think about what kit you have and how it can be used to sort out problems. Remember we had 2 prussik loops from our trad starter kit list as well as some slings. You will need to double the amount of screw gates we mentioned (your going to need enough for 2 belays on multi-pitch climbs remember)!

The world of Multi-Pitch Climbing opens up so many possibilities for you, and is a vital stepping stone if you want to head into the Mountains, the Alps and further afield. Perhaps you’ve aspirations to go Big Walling? Maybe it’s Winter Climbing? Either way, this is it! You’re well on your way to being a proper climber!

Joey on the sharp end and pushing her grade on some adventurous Pembrokeshire sea cliff multi-pitchclimbing!
Joey on the sharp end and pushing her grade on some adventurous Pembrokeshire sea cliff multi-pitch climbing!

If you come on a course with us you’ll receive a 15% discount voucher for V12 in Llanberis – one of the best climbing shops going!

Trad Climbing Starter Kit

So, you’ve taken the plunge to start Trad Climbing! It’s probably going to be the start of a life-long obsession, so you’re going to need some good kit! Go into your local climbing shop and you will be confronted by a vast array of funny shiny metal things, and probably a sales assistant looking to sell you all the latest flashy kit. It can be a bit bewildering, but actually it’s pretty simple if you know what you are looking for!

Starting Trad Climbing - What climbing kit do I need?

Starting Trad Climbing – What climbing kit do I need?

Shoes need to be comfy but snug, there’s a good possibility you’ll be spending more time in them now, on the sharp end, so perhaps give yourself that little bit of extra room, at least until you know exactly what suits you. If you find the right pair they can be tight AND comfy!  We most definitely should be wearing a good helmet when we are trad climbing, if you’ve not already got one, check it fits well with and without a warm hat or Baseball cap for those bright days). The cycling style “polystyrene shell” types (eg Petzl Meteor) are amazing and light, but the “harder shelled” helmets (eg Petzl Elios) might take a bit more abuse…

Your fancy sport climbing belay device wont be any good here, stick with the normal belay plate, such as the DMM Bug, or Petzl Reverso.  Your harness wants to be fully adjustable, you might be climbing in a T-Shirt on the sun soaked sea cliffs of Pembrokeshire, or the windy chilly mountains of Snowdonia fully laden in fleeces and waterproofs, the other consideration is does it have plenty of well distributed gear loops for all the stuff we are about to clip on it?!

Now how about the rope… I covered this in last weeks sport climbing article so will gloss over it a bit here. You need a single rope, 50 or 60m. Simple! Shorter and you wont have enough for longer pitches (remember you use lots of the rope in the belay) and too long and you’re just carting around extra rope (unless you’re off sport climbing abroad, then go for a longer one!) . When you start multi-pitch climbing there might be better alternatives (half ropes), but for now, lets stick with singes… Don’t get too bogged down looking at the elongation, falls tested etc etc… They’re all going to do the job well, but some will last longer than others, may be dry treated and handle nicer through your belay device… I would persoanlly say I’ve found Mammut to be the best, but there are other options out there.

Now for the fun (but expensive!) stuff – the ‘rack‘! You will most likely have a set of draws, some slings and crabs if you’ve been sport climbing already, and so hopefully your already at least part way to owning you own rack, but I will go through all the bits and pieces here so you can have a stress free shopping experience…

This starter rack is aimed at someone who is going out and climbing on simple, shorter climbs, if you start multi-pitch or sea cliff climbing there is yet more kit to acquire, and when you start leading trickier climbs there is different kit you may benefit from, but that’s for another article. For now, it’s the simple, basic stuff. If we learn to use well and form the solid foundations to keep us safe in our climbing careers, it will last for a long while… Not sure what those skills may be? Check out our courses here….

Trad Climbing Starter Kit

Trad Climbing Starter Kit

There will be a big difference in the cost of the kit you are buying between the budget and premium brands. It does all have to pass the same safety tests to be sold in the UK. You may come across some very cheap stuff on the internet from eastern Europe/China, this might not be 100% safe, and perhaps hasn’t got the UIAA/EU kite mark seal of approval and CE stamp (but may have a dodgy China Export C E mark!!!), so probably best avoided. The same goes for second hand stuff. Anything with fabric in it, is in my mind, a big no-no, you just can’t be sure of its history. Metal is less prone to having unseen faults, but this is stuff you will be using for years to come so why bother trying to save money when it might just save your life?! Buy new, buy decent, be safe!      

Quickdraws, or draws, are what we clip to the protection we place in the rock, and then to the rope. Basically a short sling with a snap gate at each end. If we carry around 12 of these, you can see how the weight will soon start to add up massively. For this reason I would go for a nice lightweight draw. You often get them in packs of 5, and in different lengths. You don’t want too many short ones, as they give us less chance at extending the gear enough to avoid rope drag. DMM do some excellent sets at varying lengths, look at the Spectre or super light Phantom draws. The middle and longer sizes are best, the short ones are more aimed at sport climbing. Its probably best to stump up some cash and get 2 sets of 5 so you have ten dedicated draws in total. It sounds a lot and seems expensive, but relate it to how much protection you can put in to keep you safe! Also worth getting, are a couple of sling-draws, these are 60cm clings with a snap gate at each end, giving you a couple of really long extenders put on crucial bits of gear to avoid drag. Go for dyneema as it’s so much lighter. There is a fancy way of folding them up so they are short on your harness, google it or get in touch with us! Some people will fix the snap gates on with rubber bands, I’d rather leave them loose and have them fully useable for other things.

Trad Climbing

Trad Climbing

Right, lets talk nuts. These are the wedged shaped metal objects you insert into cracks, then clip the draws onto these. They are your bread and butter of protection. Too many people rush out and buy all manner of fancy kit and skip through the important stuff. Spend time climbing with nuts and nuts alone, learn to place them well and efficiently, and one day it will save your life. Don’t do this and, well, what’s the worst that could happen?! I see far too many people placing utterly useless protection that wouldn’t hold a bag of peanuts let alone a ten stone human flying through the air. All you need to start out are a set of decent nuts. Go DMM or Wildcountry, both do a 1-11 set. You will want more eventually (or just buy 2 full sets now!), but for smaller easier climbs that’ll do, plus a couple of snap gates (go oval wire gates, not too many wires in each) to rack them on. They are now lighter than ever, and colour coded, so learn what colours equate to what size crack, place loads, keep yourself safe, test placements on a top-rope to see what works, and always think “what’ll happen if I fall of now?”…  I’m a huuuuuge fan of the DMM offset nuts, and would wholeheartedly recommend getting a set of those too! Also worth looking at, for the easier traditional routes, is a set of slightly larger hexes to cover the cracks that your biggest nuts won’t work in. DMM do the Torque Nuts, Wild Country do the rock-centric’s, and don’t forget a snap gate to rack them on.

Eventually you’ll want to get some cams/friends, but I recommend dialling in passive protection (nuts etc) first. There is more judgment involved when placing cams (active protection) and I routinely see climbers placing them poorly. Certain rock types may require more cams (parallel cracks of gritstone for example). Many companies do sets of sizes 1-3, including half sizes, which is a great starting point, but initially I wouldn’t worry about going smaller or bigger.

When you’re setting up at the top after leading a route, you will be placing enough gear to make yourself a solid, bomber belay. You will ideally have a d shaped screw-gate carabiner for each of these, so lets say 3, plus 1-2 HMS carabiners (go for something big, like the DMM Boa) for clove-hitching yourself to the belay. We wont get into the debate over snap-gates/screw gates here, you’re just starting out, so be belt and braces, make everything perfect, give yourself a margin for error, and when you know the ins and outs of what you’re doing then you can make an informed decision.

You will need a few 120cm slings, maybe a 240cm one, for threads, spikes or equalising two bits of gear, go for dyneema as it’s much lighter and more compact, plus a snap gate each…

You will need to retrieve stuck bits of gear (both leader and second should carry a nut key). There is a change you might start thinking about abseiling, and perhaps getting a specific abseil rope. perhaps it’s the best way off of the route you’ve just done, maybe you’re sea-cliff climbing.. Either way, you need to back yourself up with a prussic loop, get two, made out of 5mm cord, tied with double fisherman’s with plenty of tail on the end, around 35cm long once tied, plus a carabiner to rack them on.

As you can see, this kit soon adds up to a big old rack! Hopefully it’s a bit clearer now as to what to get. It is undeniably an expensive hobby to get into, but the amount you will hopefully be using it will make it all worth while! Looked after well it will last for years. Learn how to care for, clean and inspect your kit properly. It is there to save your life! Many people will have a regular climbing partner who they assemble their rack with to share the cost, some join clubs to use the club rack. Remember to join the BMC, they give you discount in some of the outdoor shops, public indemnity insurance, and help us look after and maintain our access to crags. They are our collective voice.

Now you’re embarking on the quest to become a trad climber, there are many new skills to learn, you need to go out and have some adventures, and you will forge memories that will be imprinted on the brain for many years. But remember, this is a dangerous hobby and it has the potential to all go horribly wrong. Learn the basics really well, don’t push your grade and rush ahead too soon, and remember to lower your grade and expectations from indoors or sport climbing. Stay safe, have fun!

Looking for a Learn to Lead Trad climbing course? Get in touch!

Not quite a Trad Climbing starter rack! Gearing up for some Big Wall Climbing in Yosemite...

Not quite a Trad Climbing starter rack! Gearing up for some Big Wall Climbing in Yosemite…

Next time I’ll look at kit for multi-pitch and sea-cliff climbing…

If you come on a course with us you’ll receive a 15% discount voucher for V12 in Llanberis – one of the best climbing shops going!